The Ultimate Guide to Using Hem Tape for Seamless Alterations
Alterations are a crucial part of maintaining a polished wardrobe. Whether it’s adjusting the length of trousers or securing the hem of a dress, having the right tools can make all the difference.
One versatile tool that has become indispensable for quick and effective alterations is hem tape. This adhesive strip offers a simple and efficient solution for making clothing adjustments without sewing. This guide will cover its essentials, from selecting the right type to applying it correctly, ensuring seamless alterations every time.
A Brief Overview
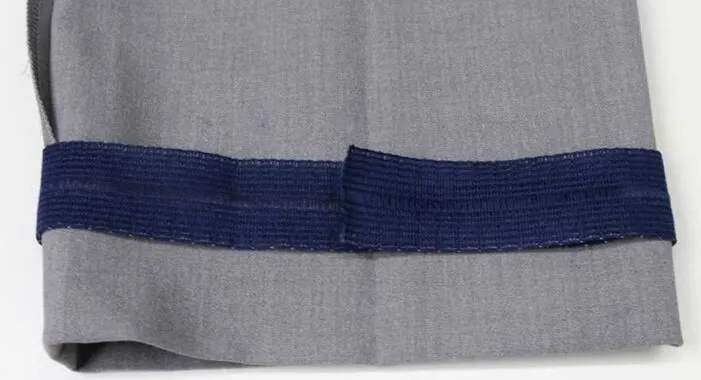
It is a double-sided adhesive strip designed to bond fabrics together. It is often used for hemming garments without needle and thread. This handy tool is perfect for those who need a quick fix or do not have sewing skills. It is available in various widths and strengths, catering to different fabric types and purposes.
There are two main styles in it: fusible and non-fusible. Fusible is activated by heat, usually from an iron, which melts the adhesive and bonds the fabric layers together. On the other hand, non-fusible tape relies on a strong adhesive that sticks to the fabric without the need for heat.
Choosing the Right One
Selecting the appropriate tape is crucial for achieving the best results. Consider the following factors when choosing:
- Fabric Type: Different fabrics require different types of tape. Lightweight materials, such as silk or chiffon, need delicate tape that will not weigh them down. Heavy-weight fabrics, like denim or wool, require a firmer adhesive to ensure a secure bond.
- Colour: It comes in various colours, including transparent options. Choose a colour that matches the fabric to ensure it remains invisible once applied.
- Width: The width of the tape should correspond to the hem allowance. A wider one provides a stronger bond but may be visible on lighter fabrics. Opt for a narrower one to keep the finish neat for narrow hems.
- Application Method: Decide whether a fusible or non-fusible tape is more suitable. Fusible tape is ideal for permanent alterations, while non-fusible ones can be a temporary solution.
How to Apply
Applying it is straightforward, but following the correct steps ensures a professional finish. Here’s a guide explaining how to use them effectively:
- Prepare the Fabric: Start by washing and ironing the garment to remove any wrinkles or shrinkage. Lay the garment flat on a clean, heat-resistant surface.
- Measure and Fold the Hem: Determine the desired length and fold the fabric accordingly. Use pins or fabric clips to hold the fold in place temporarily.
- Cutting: Measure and cut a strip of it to fit the length of the hem. Ensure it is slightly shorter than the hem to prevent any adhesive from sticking out.
- Positioning: Place the tape between the folded hem and the garment. Ensure the tape is aligned properly and covers the entire length.
- Activate the Adhesive:
○ Fusible: Preheat the iron to the temperature recommended for the fabric type. Place a pressing cloth over the hem to protect the fabric. Press the iron over the hem for the specified time, allowing the adhesive to melt and bond the fabric layers together.
○ Non-Fusible: Press the tape onto the fabric to ensure it adheres. Smooth out any wrinkles or bubbles for a clean finish.
- Finish the Hem: Allow the adhesive to cool and set completely. Remove any pins or clips used to hold the hem in place. Check the hem for any areas needing additional bonding, and reapply it if necessary.
Hem tape is an invaluable tool for making quick and seamless garment alterations. Understanding how to choose and apply them correctly can transform clothing adjustments, saving time and effort. By following these guidelines, anyone can achieve professional-looking results with ease.